Synchronization is the process of sharing files between devices. As you upload, edit, or share files from your phone, PC, or tablet, the system automatically updates the files on all devices simultaneously.
Users worldwide use synchronization to securely store important data and files and have remote access to them. On a synchronized gadget, you can restore the necessary settings and materials without loss in real time.
Despite the importance of synchronizing devices, this process may seem clunky and complicated at first sight. However, this procedure is much easier than it seems. Read our detailed guide to find out how to sync photos across all your Apple devices.
Tips to Sync Photos Across Your Apple Devices
You can use Finder or iTunes to sync content and transfer files to keep your content updated on your iPhone, PC, or Mac. For example, if you add a movie to your iPhone, you can use synchronization to have the movie appear on your computer. Or, you can copy a Pages document created on your iPhone to view or edit it on your laptop.
You can sync content such as music, movies, TV shows, podcasts, photos, contacts, and calendars. Remember that Apple products and services are not locked upon one device. With a long history, many loyal customers, and various products created over decades, Apple wants to make it possible for users to keep their files safe within several devices.
It doesn’t matter if you pay for cloud storage or if you have the latest iPad or iPhone, as you always have several ways to synchronize your media across devices. Let’s have a look at these methods.
#1. Set up iCloud Photos
You can safely store your media, notes, passwords, and other files in Apple’s cloud storage service. iCloud automatically keeps your files updated on all your devices.
iCloud is associated with an Apple ID account and your device. By purchasing a cloud storage plan, you can back up your device, use family access, share your subscriptions, photos, and videos with your family, and use the built-in VPN.
To set up iCloud on your devices, sign in to each device with the same Apple ID and password. You can choose which apps to store in iCloud and which iCloud features to use on each device.
- If using a Mac, open “System Preferences” and click on your name.
- Open “iCloud” on the right side of the screen.
- Check the needed programs or files to be synchronized via iCloud.
Remember, a user might witness duplicated images, as this sometimes happens due to syncing errors. If you don’t know how to delete duplicate photos on Mac, you can remove duplicates using third-party applications or manually.
#2. Sync photos via iTunes
In case you use an older version of macOS, you should use the iTunes application to sync your devices:
- Connect your iPhone to the PC via a USB cable.
- Open iTunes and click on the icon at the top left corner of the iTunes window.

- Choose the desired content for synchronization or removal from the list located in the Options menu on the left-hand side of the iTunes window.
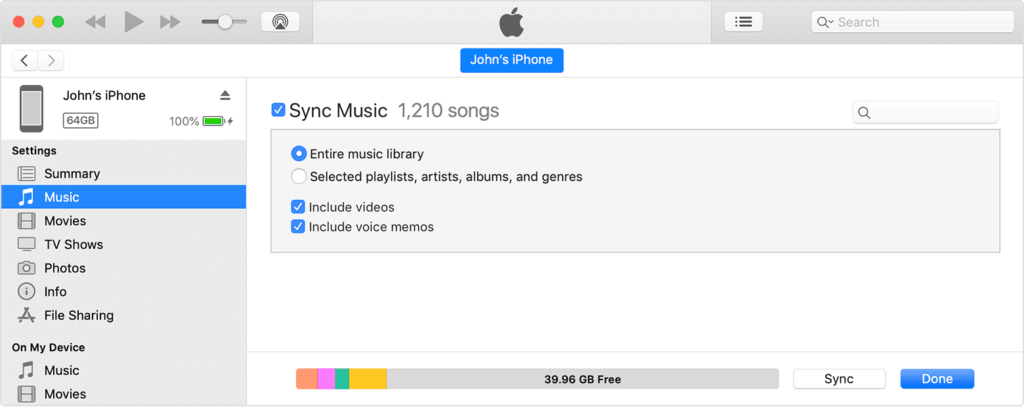
- Click “Apply”.
Once done, you can now allow iTunes to do the same procedure using Wi-Fi instead:
- When connected to your PC by a cable, open iTunes and click “Summary” on the left side.
- Tick “Sync with this [device] over Wi-Fi”.
- Then “Apply”.
The gadget will appear in iTunes when it is connected to the same Wi-Fi network as the computer.
#3. Use My Photo Stream
Despite being almost inactive, My Photo Stream is still used to save your media. It uploads your recent photos to view them across multiple devices for 30 days.
- iOS 8 or later
Tap Photos –> Albums –> My Photo Stream. - Apple TV
Sign in to your iCloud, go to Settings –> iCloud –> iCloud Photo Settings, and tick “Turn On My Photo Stream”.
#4. Share photos via Shared Albums
One of the fastest ways to share memories with friends or relatives is through a commonly shared iCloud storage.
- Activate the shared albums feature: open Settings and follow the path: Apple ID → iCloud → Photos.
- Enable the “Shared Albums” marker. Now you can use a shared iCloud photo album.
- Create it the same way as a usual album in Photos: tap on the + icon in the top-left corner and tap “New Shared Album”.
#5. Set up Family Sharing
You can share storage space, music subscriptions, and App Store purchases between up to five users via Family Sharing. Each member will have their own iCloud Photo Library, but the family album allows for storing common media files.
An adult “family manager” can set up Family Sharing for a group from their iPhone or iPad.
- Open “Settings”.
- Click on your name.
- Open “Family Sharing”.
- Now just follow the instructions on your screen to set up a Family Sharing group.
If you want to invite additional members to your Family Sharing group, you can send them invitation links through iMessages or by email.
Conclusion
Synchronizing your files is a great feature that lets you keep your photos close at hand on all your devices. Any new photos you take with the camera on your iPhone, iPad, or iPod touch will be added to your iCloud Photo Library, available on all Apple ID-enabled devices.
We recommend using the iCloud service, as you don’t need to do anything for iCloud to sync your photos across all your devices. When you turn on iCloud on your device, it will sync your data every 24 hours. Make sure your device is turned on and connected to the Internet because iCloud won’t sync your photos if it’s not.